
How To Build A Computer Vision Mobile App In Flutter
FLUTTER | 04 Feb 2020
Machine Learning features have become a must-have in today’s applications. They can improve satisfaction and give your audience the extraordinary app experience they want. Thanks to recent hardware and software optimizations, execution of Machine Learning models is moving from the cloud to the mobile devices themselves.
This has a huge impact on user experience, by removing the response latency and addressing privacy issues. When we decided to build Planter, an app helping users take care of their house-plants, we knew that the thing that could make it stand out on the app market was AI.
Our idea was to add the functionality to recognize type of house-plant from an image, using computer vision techniques. Thanks to TensorFlow Lite optimizations of the on-device performance, the app can run our classification model solely on the user’s device. In this article, I will explain how to quickly prepare an image classification model, and deploy it in an app developed with Flutter.
Building Machine Learning Module
Dealing with a Small-Data Problem
The first step of building a Machine Learning model is data collection. In order to create a training dataset, we used Google Images Downloader that allowed us to download plant images from a Google Search, with rights labelled for commercial reuse, with the following short script:
| $ googleimagesdownload --keywords "Zamioculcas zamiifolia" --usage_rights labeled-for-reuse |
Our final dataset consisted of about 70-170 images per species. It would have been very hard to prepare a well-performing image classification model from scratch with so little data. Fortunately, there are some powerful pre-trained artificial neural networks available publicly that can be used to build a high-accuracy image classifier, even if your dataset consists of only around a hundred examples for each class. This technique of using and modifying a pre-trained model to a specific use case is called transfer learning.
Data Augmentation
In order to take maximum advantage of our dataset, we used keras’ ImageDataGenerator preprocessing package, which generates batches of tensor images, augmenting them on-the-fly. We used the following transformations:
- Flipping inputs horizontally: horizontal_flip = True
- Setting a brightness shift value from range: brightness_range = (0.75, 1.25)
- Shearing with the provided intensity: shear_range = 15
- Rescaling, by multiplying by a specified value: rescale=1./255
- Zooming in and out: zoom_range=0.4
- Shifting in any direction: width_shift_range = 0.1, height_shift_range = 0.15
|
train_datagen_augment = ImageDataGenerator(rotation_range = 30, horizontal_flip = True, brightness_range = (0.75,1.25), shear_range = 15, rescale=1./255, zoom_range=0.4, width_shift_range = 0.1, height_shift_range = 0.15) |
Training
Our approach was based on the strategy described in this keras blog post. We used NASNet-Mobile, a convolutional neural network trained on more than a million images from the ImageNet dataset. NasNetMobile architecture consists of a set of blocks built with neural network cells. Block is an operational module that includes transformations known from image classifying neural networks, including: normal convolutions, separable-convolutions, max-pooling, average-pooling, identity mapping, etc. The network had been trained to assign to an image 1 out of 1000 categories that include animals, flowers, and furniture. As a result, the network has ‘learned’ rich feature representations for a wide range of images.
We created our model completing the following steps:
- Remove the last layer of the pre-trained network.
- Add a convolutional model at the end of the network.
- Freeze all the layers in the combined network except those that come from the added model.
- Train the model until the accuracy stops improving.
- Unfreeze all layers in the last frozen convolutional block of the pre-trained model.
- Train the model until the accuracy stops improving.
- Repeat points 5 and 6 five times.
- Unfreeze the entire model, and train it until the accuracy stops improving.
Model Evaluation
The Planter’s classification model tries to assign a plant type to a house-plant, based on its photo. The model returns three types it assigned the highest probabilities to, from which the user can choose one. During evaluation of the model, we used the following two metrics:
- categorical_accuracy,
- top_k_categorical_accuracy (with k=3).
The following graph presents the categorical accuracy for each training epoch of our model.
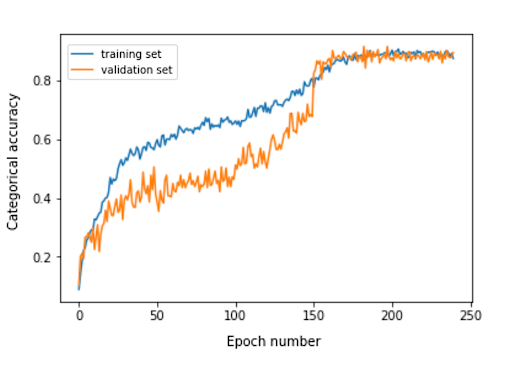
The final categorical accuracy for the evaluation set is 0.870, and the top 3 categorical accuracy is 0.916. These results were very satisfying, taking into account the small size of the training dataset used.
Model Conversion
If we want a keras model to be used in a mobile app, it needs to be converted to a TensorFlow Lite FlatBuffer object. This can be done with the code shown in the example below.
|
import tensorflow.lite as lite keras_model_path = "model/keras_model" tflite_model_path = "model/model.tflite" model.save(keras_model_path) converter = lite.TFLiteConverter.from_keras_model_file(keras_model_path) tflite_model = converter.convert() open(tflite_model_path, "wb").write(tflite_model) |
Now that we had the optimized model stored in the model/model.tflite path, we could easily use it in the native mobile apps, using:
- Core ML - for iOS apps
- TensorFlow Lite Android Support Library - for Android apps
I will now show you, based on our experience with Planter, how to use that model with Flutter.
Flutter
Flutter is a UI toolkit owned by Google. It was created to build natively compiled applications for mobile, web and desktop from a single codebase. If you are wondering whether you should use Flutter, I recommend reading this article, which is a case study of Topline by Abbey Road Studios developed in Flutter by Miquido.
We can utilize our model with the tflite library. It is a Flutter plugin for accessing TensorFlow Lite API. It supports image classification, object detection, Pix2Pix, Deeplab and PoseNet on both iOS and Android platforms.
In our application development process, we had to complete the following steps:
1. Add tflite as a dependency in our pubspec.yaml file.
2. Create an assets folder and place a label file and a model file in it.
3. In pubspec.yaml, add:
|
assets: - assets/labels.txt - assets/mobilenet_v1_1.0_224.tflite |
4. Import the library tflite:
| import 'package:tflite/tflite.dart'; |
5. Load the model and labels:
|
String res = await Tflite.loadModel( model: "assets/model.tflite", labels: "assets/labels.txt", numThreads: 1 // defaults to 1 ); |
6. Run the model on an image (make a prediction):
|
var recognitions = await Tflite.runModelOnImage( path: tfResizedImage.path, imageStd: 255.0, numResults: 3, threshold: 0.00001, asynch: true ); |
The prediction output has the format shown in the following example:
| [{confidence: 0.03441339731216431, index: 46, label: Vriesea splendens}, {confidence: 2.086162567138672e-7, index: 7, label: Aphelandra squarrosa}, {confidence: 1.4901161193847656e-7, index: 19, label: Fern arum}] |
7. Release resources:
| await Tflite.close(); |
End Results
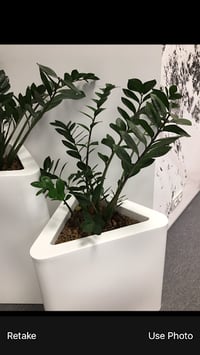
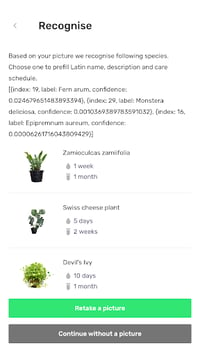
Planter allows you to add a plant with an image to your library. You can get the image by taking a photo of your plant, or choosing one from the phone’s gallery. The included house-plant classification model returns three species recognized with the highest probability, and presents them on a list. Clicking a species will lead you to the plant summary view, which contains a pre-filled form with suggested watering and fertilising schedules, and some additional information about the plant. In the flow below, you can see an example in which a Zamioculcas zamiifolia is recognised in an image taken with a camera phone.
 |
 |

|
Move Your Machine Learning to Mobile!
In this article I wanted to convince you that adding user-delightful AI features in your mobile app can be simple and quick. What is more, moving the model execution to mobile gives your users a delightful user-experience by removing API response latencies. It also helps ensure data security, as sending data to the cloud is not required. You can benefit greatly from using Flutter and its ability to compile code for both iOS and Android native apps at the same time. With little effort you can make your app stand out on the market, and maximise your app’s audience retention.
Editor's note: This is a guest post from Miquido. Miquido is an award-winning digital product development company that excels at building AI-driven apps and web services. The laureate of Deloitte Technology Fast 50 CE, the winner of UK App Awards 2018. Certified by Google, covered by TIME & Forbes.
